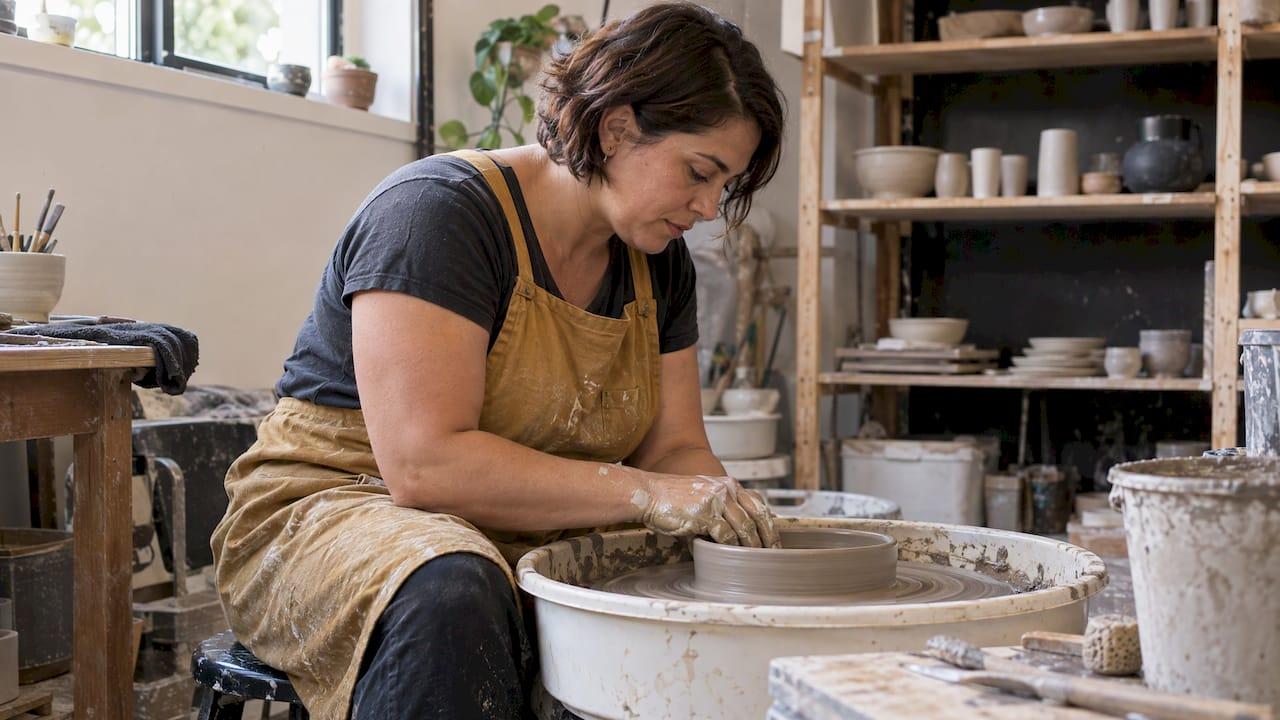
The best brand photo props are the ones that already belong in your working day: one hero item that says what you do, plus a couple of simple supporting pieces. Everything else competes with your face. At Life in Style Photography in Auckland, we plan props with you before the shoot, so you arrive knowing what to pack and you never have to guess how to hold any of it. If you want that planning built into a session, our personal branding sessions start at 575 NZD.
TL;DR
- Choose one hero prop that shows what you do, and two supporting props for texture, posing or context.
- Props should be native to your business: tools, devices, products, a workspace item. If it does not belong in your day, leave it at home.
- Check colours against your outfit and keep shiny surfaces, small patterns and busy packaging to a minimum.
- Props give your hands something natural to do, which helps most people who feel camera-shy.
- Plan the list before the shoot with your photographer, so every item earns its place in the final crop.
Table of Contents
- What props do in a brand photo
- Start from your story, not from a prop list
- The hero prop plus two support props
- Props that work for common NZ businesses
- Using tools, devices and everyday objects naturally
- What distracts on camera
- A simple prop checklist for the week before
- Our view on props
- Plan your props with us
- FAQ
- Sources
What props do in a brand photo
A prop is any object in the frame besides you. In brand photography its job is to give a viewer context in a second: a potter with clay on her hands, a trainer with a kettlebell, an accountant with a notebook and a flat white. One NZ creative studio describes props as giving context, depth, texture and personality to otherwise static subjects, turning them into a visual story.
Props also solve a practical problem. Many people tell us they don't know what to do with their hands. A mug, a laptop or a pen answers that question, and the pose follows naturally. We guide you through that on the day, so you don't need any posing experience.

Start from your story, not from a prop list
The common mistake is searching for "10 props every brand shoot needs" and buying them. Work backwards instead. A Wellington-based agency's advice is to know the product deeply and decide the final image first: what it does, how it is made, who it is for. Only then choose props, textures and backgrounds.
Three questions get you most of the way:
- What do clients hire or buy from me? The answer is your hero prop's territory.
- What does my best day of work look like? That tells you the setting and the supporting items.
- What do I want a stranger to feel in five seconds? Calm, energetic, premium, friendly. This steers colour and texture.
Brand guidelines can help too. Another NZ agency suggests brand imagery guidelines should name the core props that create context, so every image uses the same visual language. If you already have brand colours, a simple rule such as neutral linen with one accent colour is enough.
The hero prop plus two support props
A simple structure keeps frames clean: one hero prop that shapes the story, and two supporting props for posing, texture or context, as suggested in this prop styling guide.
| Role | What it does | Example |
|---|---|---|
| Hero prop | Tells people what you do | Camera, kettlebell, planner, product, tools |
| Support prop 1 | Gives your hands a job | Coffee cup, pen, phone |
| Support prop 2 | Adds texture or colour | Plant, linen, notebook, ceramic bowl |
The hero should be readable even when the photo is cropped square for Instagram or narrow for a website banner. If the hero disappears in the crop, it is the wrong hero.
Props that work for common NZ businesses
Native props work best. Ward Black's checklist lists laptops, notebooks, packaging, tools, menus, flowers, instruments and workspace items as options, provided they genuinely belong to the business. Here is how that looks by type of client.
Consultants, coaches and professionals
A laptop, a notebook with a pen, a phone and a mug are the classics for good reason. Books and notebooks suggest storytelling, and mugs suit casual brand portraits, as Lensology notes. Use a closed or blank laptop screen unless the content is meant to be seen, which also keeps client information private.

Makers, creatives and retailers
Your work in progress is the prop: sketchbooks, fabric, clay, packaging, a finished product in your hands. Art supplies suit behind-the-scenes portraits. Show the hands working, not only the finished item, because that is what makes people trust the craft.
Fitness trainers and wellness practitioners
Choose equipment you actually coach with: a barbell, bands, a mat, a skipping rope, a towel and a water bottle. Keep branded drink bottles with loud logos out of the hero position. For more on planning a trainer's image library, see our guide to fitness branding photos, or our fitness photography packages from 460 NZD.
Real estate agents and service businesses
Keys, a clipboard, a branded vehicle or a sign are honest props. Pair them with a real location, not a studio backdrop. Our real estate branding shot checklist covers the frames worth planning.
Using tools, devices and everyday objects naturally
The difference between a staged prop and a natural one is action. Holding a phone and looking at the lens looks staged. Reading a message with a half smile looks like a Tuesday. A few habits help:
- Give the object a task. Type, sketch, pour, measure, wrap a parcel.
- Use things that show wear. A well-used notebook beats a new one.
- Keep devices simple. Remove stickers, close extra tabs and turn off notifications so reflections stay clean.
- Let the prop sit off-centre. You are the subject, so your face should keep the strongest light and the clearest space.
This balance between supporting props and the main subject is the same one writers face with supporting characters, and tools for keeping a supporting cast consistent rest on the same idea: nothing should upstage the lead.
What distracts on camera
Some props look fine in person and poorly in photos. Watch for:
- Shiny or reflective surfaces such as glossy tablets, mirrors and chrome, which catch the light and pull the eye.
- Small, busy patterns on cushions, mugs or fabric, which can shimmer and clash with clothing.
- Packaging with heavy branding, which can look like an advertisement rather than a story.
- Cheap-looking textures, such as thin plastic or flimsy paper, which read as low quality at a larger size.
Wardrobe matters as much as props. If your jumper and your hero prop are the same colour, one disappears. Our guide to outfit colours that keep faces the focus explains how to choose two to four palettes, and we suggest you bring two outfits so props can be matched to each look.
Keep the set simple enough to reuse. Shout + Co's advice is that simple props stay reusable across shoots without looking repetitive, and that layering at least three pieces such as linen, a wooden board or ceramics builds depth. Thrift shops are a good local source.
A simple prop checklist for the week before
- Write your hero prop and two support props.
- List the three or four outfits or colours you plan to wear.
- Clean and check every item: fingerprints, dust, loose labels, fully charged devices.
- Photograph each prop on your phone beside your outfit to see how the colours sit.
- Pack one or two spares, such as a second mug or notebook, in case one looks wrong on the day.
- Send the list to your photographer and ask what will suit the location.
If you are planning a larger set of images, our small business photoshoot ideas and rebrand photoshoot checklist show how props fit into a full shot list. Our guide to planning a brand shoot with privacy in mind is worth reading if your props include client work, documents or a home office.
Our view on props
We have photographed a lot of people who arrive worried that they don't know what to do in front of a camera. In our experience, a good prop plan is one of the kindest things you can give yourself, because it gives your hands, your attention and the whole session a purpose.
Our approach is relaxed and engaging, and it prioritises personal connection. Props support that: they start conversations on set, and they relax people into movement that feels like them. We would rather you bring three honest objects from your working life than a bag of decor bought for the day.
That is why we plan before we shoot, give clear guidance on the day, and never expect you to know how to pose. Props are part of the story we tell together, and the story is you.
Rowan Freeman
Plan your props with us
Our personal branding sessions in Auckland come in three options: the Starter Brand Session at 575 NZD, the Signature Brand Session at 1035 NZD and the Complete Brand Session at 1495 NZD. Each is shaped around your business, so your props, outfits and locations are decided together beforehand.
See the personal branding sessions and browse the personal branding portfolio to see how props appear in finished images. For corporate headshots, we offer headshot sessions from 345 NZD. If you want more ideas on building a library of images, our guide to personal branding photo ideas is a good next read.
FAQ
How many props should I bring to a brand photoshoot?
Bring one hero prop and two supporting props, plus a spare or two. That is enough to build a layered frame without crowding you out. More items tend to take time on set and rarely improve the final images.
Do I need props if I'm just after headshots?
Not necessarily. A clean headshot works with no props at all. For a brand portrait, one small, relevant item such as a notebook or a tool of your trade adds context and gives your hands a natural position.
Should my props show my logo?
A subtle logo on a notebook or mug is fine. Heavy branding on packaging or clothing can look like an ad and pull attention from your face. Let colour and the type of object carry the brand instead.
What if I'm camera-shy and don't know what to do with the props?
That is very common. Pick props you use daily, and your photographer will direct you through simple actions like typing, pouring or flipping a page. We give clear guidance throughout, so you never have to work out poses on your own.
Sources
- Props to the Props, Sophie Louise Creative
- Creating a Story, Shout + Co.
- Visual Consistency, Shout + Co.
- Brand Photoshoot Checklist, Ward Black
- Photography Props That Instantly Upgrade Your Product and Portrait Shots, Lensology
- Props for Photoshoots: Ideas by Session Type