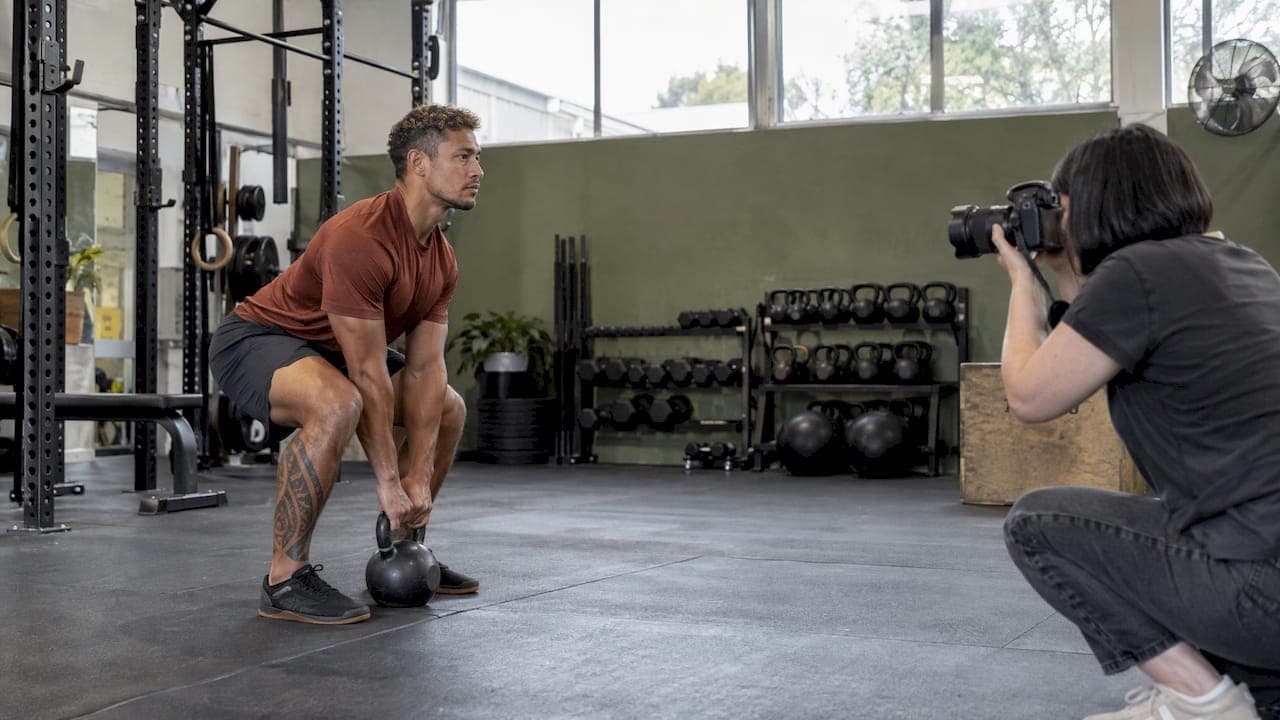
Fitness branding photos are a set of images made to show who you are as a trainer, coach or studio, what you offer and what working with you feels like. They are planned around your brand rather than taken as a one-off portrait, and you use them on your website, social media, bookings pages and print. Below, we cover what to shoot, how to plan the day, how to relax in front of the camera and what to check before you publish the images.
TL;DR
- Branding photos work best when they match your real clients, your real space and your real personality, so plan the shoot around your brand first and the poses second.
- A good set mixes a clean portrait, action shots, coaching moments and detail images, so each channel has something that fits.
- Pick your location, two outfits and your intended uses before the day, and write a short shot list.
- Anyone identifiable in the photos, such as clients or staff, should agree in writing to how you will use their image.
- You do not need to know how to pose. A good photographer guides you, and we do exactly that.
Table of Contents
- What fitness and wellness branding photos actually are
- How the photos communicate your identity and services
- Planning the shoot: goal, location, clothing, props
- Poses, movements and image types that work
- Looking and feeling natural in front of the camera
- Using your images properly: consent, privacy and licensing
- Fitness photography sessions with Life in Style
- A simple one-week prep timeline
- FAQ
- Sources
What fitness and wellness branding photos actually are
A stock image of a stranger lifting a barbell says "fitness". A branding photo says "this is Sam, she coaches women over 40 in a small Ponsonby studio, and this is how a session feels". That difference is the whole point.
Ordinary portraits capture how you look. Branding photos capture what you do and who you do it for. A set usually covers:
- A hero portrait for your website header, bio and email signature.
- Action images of you training, demonstrating or moving, which show your discipline and style.
- Interaction images of you coaching someone, which show the experience of working with you.
- Detail and environment shots of your gear, studio, mat or outdoor spot, which give the brand a sense of place.
The same logic applies to wellness. A yoga teacher, Pilates instructor, nutritionist or massage therapist needs images that carry the feeling of the service: calm, warm and welcoming rather than intense. If you are a trainer, you might also like to read our fitness photoshoot ideas with a 10 shot brief for a deeper list of frames.
How the photos communicate your identity and services
People choose a trainer or studio partly on a feeling. They want to know whether they will fit in, whether they will be judged and whether the place looks like somewhere they could turn up to on a Monday morning. Your photos answer those questions before you do.
New Zealand web designers who build sites for studios make the same point. One guide for Yoga and Pilates studios says real instructor names, specialities and photos build trust faster than generic stock images. A creative agency working with fitness businesses describes the job of photography as reducing a prospective member's anxiety with an accurate picture of what walking through the door will be like. Both ideas come down to honesty. Show the real you and the real space.

Match the visual tone to the service
The same guide suggests yoga and Pilates studios use a softer visual language than a CrossFit gym, with warm tones and breathing room. In photo terms, that means:
- High-intensity training, strength, boxing: stronger contrast, directional light, darker or moodier backgrounds, tight crops on effort and movement.
- Yoga, Pilates, mobility, wellness: soft natural light, lighter tones, more space around the subject, slower and calmer poses.
- Personal training and coaching: a balance, with a confident portrait, plus warm interaction shots that show you are approachable.
Keep it consistent across channels
Branding also works through repetition. When your website, Instagram, flyers and the physical space all share a similar palette, clothing style and mood, the brand carries across advertising, website and environment for a seamless experience. That is why we ask about your colours, your logo and your existing space before we pick a location or lighting approach.
Planning the shoot: goal, location, clothing, props
Most disappointing shoots were under-planned, not badly photographed. Planning guides from New Zealand creative teams agree on the basics: define the goal, brand personality, channels and target audience, then detail the date, location, shot list, people and props, and check light, traffic, terrain and backup locations. Here is how that looks for a fitness or wellness brand.
1. Write down the goal and where the images will live
Be specific. "A new website header, six Instagram posts a month and a flyer for my winter bootcamp" is a brief a photographer can shoot to. "Some nice photos" is not. Vertical crops suit stories and reels, wide crops suit website headers, and square or portrait crops suit feeds. Telling us the uses up front means we frame for them. If you want a ready-made structure, our 8 point photography brief for New Zealand clients is copyable.
2. Choose a location that tells the truth
Options in Auckland are wide: your own gym or studio, a park or beach, a rooftop, an industrial studio or a neutral photography studio. Pick the one your clients will actually see you in. If you train people at Takapuna Beach at 6am, that beach is your brand. If you run a boutique studio, the studio should appear in the set.
Check these before the day:
- Time of day and direction of light (early morning and late afternoon are kinder than midday).
- Foot traffic, noise and whether you need permission to shoot there.
- Terrain and footing, especially for running, jumping or lifting outdoors.
- A backup location or indoor option, because Auckland weather changes quickly.
3. Bring two outfits and plan the details
Clothing that fits well and suits your brand colours photographs better than anything new and untested. Avoid large logos and busy patterns, which compete with you. A second outfit gives the set variety, and our note on bringing two outfits to every photoshoot explains how to pick the pair. For training-specific advice, from wardrobe to warm-up, see our guide to fitness photoshoot preparation.
Props should be the tools you genuinely use: kettlebells, resistance bands, a yoga mat, a water bottle, a clipboard, a towel. Leave out anything that is there only to look busy.
4. Know who else is in the shot
Interaction shots are some of the most persuasive images in a fitness set, and they need a willing client or team member. Invite them early, tell them what the images are for and get written consent (more on that below). For a wider look at how a commercial shoot comes together, this brand photoshoot planning guide covers personality, audience and channels in a clear sequence. We also cover the New Zealand privacy angle in our own post on brand photoshoot planning for NZ small businesses.

Poses, movements and image types that work
You do not need a long list of dramatic poses. You need a handful of frame types that each do a job. Here is a structure we like for a half-day or shorter session.
| Image type | What it shows | Where it works best |
|---|---|---|
| Hero portrait, to camera | Confidence and approachability | Website header, About page, email signature |
| Mid-movement action | Skill, strength, discipline | Social posts, banners, class promotion |
| Coaching moment | The experience of training with you | Services page, testimonials, brochures |
| Candid laugh or pause between sets | Personality and warmth | Instagram, newsletters |
| Details: hands, gear, shoes, mat | Texture and brand colours | Backgrounds, carousels, packaging |
| Environment wide shot | Your space and its atmosphere | Location pages, Google Business profile |
Movements that photograph well
Choose moves you do every day with clients, and let the photographer time the shot. Good candidates:
- Strength: a deadlift setup, a kettlebell swing, a pull-up, a loaded carry.
- Conditioning: a sprint start, skipping rope, battle ropes, a box jump.
- Yoga and Pilates: a held balance, a flowing transition, a stretch against natural light.
- Coaching: a spotting position, a form correction, a high five, a whiteboard explanation.
Repeat a movement three or four times. The first attempt is rarely the best, and repetition is normal on a fitness shoot. If you are after a more dramatic look, our fitness photography packages are built around bold, high-energy imagery.
A note on lighting and mood
Lighting does much of the branding work. Hard, directional light with deeper shadows reads as powerful and gritty. Soft window light reads as calm and caring. Decide which one your clients are looking for, and tell us. It affects location, time of day and even your clothing colour.
Looking and feeling natural in front of the camera
Most trainers are comfortable moving and uncomfortable being looked at. That is normal, and it is what a photographer is there to solve. A few things help.
- Warm up as if it were a session. Ten minutes of light movement settles nerves and gets blood flowing, which shows in your face and posture.
- Do the thing, not the pose. Coaching a real person, or running through your usual set, gives natural expressions that a held pose cannot.
- Sleep, water and a normal meal beforehand. Avoid trying a new tan, haircut or supplement the day before.
- Pick music you like. A familiar playlist changes the mood in a studio quickly.
- Look at the photographer between frames, not at the screen. Stop checking every shot. Trust the process and review at the end.
If you tell us you are camera-shy, we plan the session so you are moving or talking in the first minutes, rather than standing stiffly in front of a lens. That relaxed, guided approach is how we work on every shoot, and you do not need to know how to pose.
Using your images properly: consent, privacy and licensing
Branding photos are a business asset, so treat them like one. If clients or staff appear in them, you carry responsibility for how the images are used.
New Zealand government guidance on licensing images says agencies should obtain a sufficiently broad model release before licensing a photo for reuse where an identifiable person's rights could be affected. That guidance was written for government agencies in 2017, but the principle is sound for any business: get permission that covers every use you intend. The same guidance notes that privacy law can restrict public disclosure of photos of staff or clients, even when they agreed to an internal use. In practice:
- Ask anyone identifiable to sign a simple release that names the uses: website, social media, print, paid ads.
- Say how long you will use the images and how a person can ask for removal.
- Do not stretch a consent for one purpose (say, an internal newsletter) to cover a public advertisement.
- Agree with your photographer in writing how you may use and edit the files.
For questions about your own obligations, speak with a New Zealand lawyer or the Office of the Privacy Commissioner. Our brand photoshoot planning post covers the practical privacy steps for small businesses in more detail.
Our view: your photos should look like your sessions
We shoot a lot of trainers and small wellness businesses around Auckland, and the best results come from one simple rule: the photos should look like what happens in your sessions. When we work with someone, we start with who their clients are and what a good session feels like, and we build the shoot from there.
Most people who come to us are not comfortable posing, and that is fine. We plan carefully, give clear direction and keep the atmosphere relaxed, so your energy comes through rather than a stiff, borrowed expression. We think that is what makes branding photos work: they feel genuine, so the right clients recognise themselves in them.
We would rather you leave with a smaller set of images that you love and use every week than a huge gallery that never gets posted.
Rowan Freeman
Fitness photography sessions with Life in Style
If you would like to put this plan into practice, our Auckland fitness sessions are priced as fixed packages, in New Zealand dollars:
- The Mini Shoot: $460
- The Standard Shoot: $570
- The Premium Shoot: $800
If your goal is broader, such as a new website, a rebrand or a full content library, our personal branding sessions start at $575 for the Starter Brand Session, with the Signature at $1035 and the Complete at $1495. You can see how the images look in our personal branding portfolio, then get in touch through our site to talk through your goals and the right package.
If you are refreshing an existing brand, our rebrand photoshoot checklist helps you list the shots you will actually use.
A simple one-week prep timeline
A short timeline keeps the day calm.
- One week before: confirm your goal, channels, location and who else will appear. Send us your brand colours and a few images you like.
- Three days before: choose two outfits, wash and check them, and gather your props. Get signed releases from anyone joining.
- The day before: keep training light, drink water, sleep well and charge anything you will bring.
- On the day: arrive a few minutes early, warm up, and focus on doing your work. We handle the direction.
- After the shoot: choose your favourites, keep a record of consent forms, and plan a posting schedule so the images are used within the first weeks.
FAQ
How many fitness branding photos do I need?
It depends on where you will use them, but think in categories rather than a number. You want a hero portrait, several action images, a few coaching or interaction shots and some detail and environment images. That gives enough variety for a website and a few months of social posts. Tell us your channels and we can plan the set around them.
Can I use branding photos for wellness services like yoga or nutrition coaching?
Yes. The approach is the same, but the look changes. Softer light, warmer tones and calmer movement suit most wellness services, and images of the consultation or class setting help clients picture themselves there. Your photographer should adapt the style to your service rather than apply one gym-style look to everyone.
Do I need to know how to pose?
No. We guide you through every frame, and most of the best images come from movement or conversation rather than held poses. Tell us if you feel nervous and we will plan the first part of the session around activity so you settle quickly.
What if my clients appear in the photos?
Get their written agreement before the shoot, covering where and for how long you will use the images. New Zealand government guidance recommends a broad enough model release when an identifiable person's rights could be affected. If you are unsure about your own obligations, check with a New Zealand lawyer or the Privacy Commissioner.
Is stock photography ever enough?
Stock images can fill small gaps, such as a background or an abstract graphic, but they cannot show your people, your space or your coaching. For anything that sells your service, real images of you carry more weight, which is why studio guides recommend real instructors and real photos over generic stock.
Sources
- Web Design for Yoga & Pilates Studios NZ (2026 Guide)
- Life Co-Lab, Greenhouse Creative
- Easy steps for making each shoot a success, Avodah
- Guidance note 6: Licensing and use of images, data.govt.nz
- Brand Photoshoot Planning: A Step-by-Step Guide