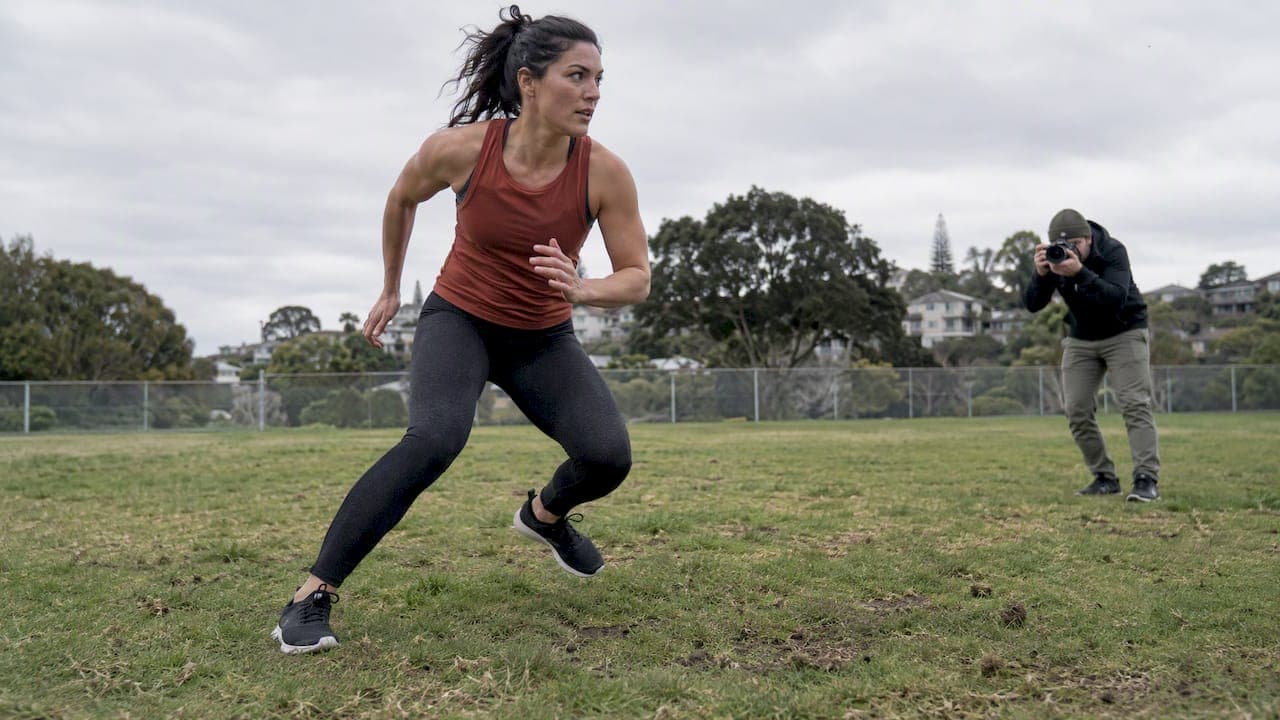
For licensed outdoor fitness photos, start with paid stock collections for commercial work, free-photo libraries for blogs and moodboards, and visual boards for ideas. If you want original images, brief a photographer with the 10-shot list below and book early morning or late afternoon light. We offer fitness shoots that deliver exactly that kind of set.
TL;DR:
- For commercial use, choose paid stock or confirm each free image permits commercial reuse, editing, and any required attribution; treat social posts as inspiration only.
- Schedule action frames for early morning or late afternoon; from September through April, avoid peak UV hours between 10 AM and 4 PM.
- Start at 1/500s or faster to freeze movement, use roughly 1/30s to 1/60s while panning for deliberate blur, and leave room ahead.
- Casual handheld photography in public is generally allowed, but commercial or disruptive Auckland shoots may need approval; permits also apply to reserved street parking.
Table of Contents
- Where can you find outdoor fitness photos to download?
- Outdoor fitness photoshoot ideas: a copyable 10-shot brief
- Lighting and timing: when do outdoor fitness photos look best?
- How do you capture movement with composition, posing and camera settings?
- What should you bring to an outdoor fitness shoot?
- What are the public-space rules for fitness shoots in New Zealand?
- Why is our guidance practical?
- How do you make outdoor fitness photos feel authentic?
- How we can help with your outdoor fitness shoot
- FAQ
- Sources
Where can you find outdoor fitness photos to download?
The right source depends on what you plan to do with the image. A gym flyer, a paid ad and a personal moodboard all carry different licence needs, so decide that first.
- Paid stock libraries: high-resolution, properly licensed and usually model-released. This is the safest route for commercial projects where rights matter.
- Free-photo libraries: handy for blogs, newsletters and moodboards. Read the licence for each image, because commercial reuse, editing and attribution rules vary from site to site.
- Visual communities such as Pinterest and Instagram: excellent for spotting poses, locations and colour palettes, but the pictures are rarely licensable. Treat them as inspiration, not a download source.
- Licence checklist: confirm commercial use is allowed, check whether you can modify or crop the image, and note whether attribution is required.
If you can't find the exact frame you want, that gap is usually the sign it's time to commission your own. For technique and inspiration on outdoor shooting, Outdoor Photographer Magazine is a useful reference.
Outdoor fitness photoshoot ideas: a copyable 10-shot brief
Hand this list to a photographer, or use it to structure a DIY session. Each shot has a purpose, a framing and one technical note. Our blog also has a longer post on fitness photoshoot ideas.
- Wide environmental hero: subject small in a big landscape; wide lens, f/8 for sharp scenery.
- Runner passing camera: subject crosses the frame; 1/1000s to freeze stride.
- Hands and feet close-up: laces, grip, chalk or foot strike; short telephoto, fast shutter.
- Partner drill: two people working together; keep both faces in the same focal plane.
- Equipment detail: bands, shoes, kettlebell on grass; wide aperture for soft background. Warm-up portrait: relaxed, eye contact, natural light; use a portrait lens if you have one.
- Full-length movement freeze: a jump, lunge or sprint start at 1/800s or faster.
- Slow-shutter motion blur: pan with the subject at around 1/30s for streaked energy.
- Post-workout candid: breathing hard, laughing, towel in hand; shoot continuously.
- Brand and kit detail: clean shot of logo, bottle or apparel for later use.
For groups, repeat shots 1, 2 and 4 with everyone in frame. For solo athletes and coaches, add extra portraits. Two or three outfit swaps give you variety without changing location.
Pro Tip: Shoot the hero and movement frames first while energy is high, then finish with slower portraits and detail shots.

Lighting and timing: when do outdoor fitness photos look best?
Early morning and late afternoon give softer light, longer shadows and warmer skin tones. Midday sun flattens faces and creates harsh shadows under caps and brows.
- Avoid the peak: between September and April, take particular care with sun protection between 10 am and 4 pm, and seek shade where possible.
- Use backlight: placing the sun behind your subject creates a rim of light along shoulders and hair. Add a reflector or light fill flash so faces don't go dark.
- Expose for the highlights: hold detail on sweaty skin and bright sky, then lift shadows later.
- Protect your people: bring shade, sunscreen and water for subjects and crew.
The timing advice lines up neatly with health guidance. New Zealand sun-exposure guidance recommends early morning or late afternoon for outdoor activity from September to April, avoiding peak UV between 10 am and 4 pm. Photographers working in this market also advise that anticipating movement and managing light drive the most effective fitness imagery, which is why we schedule outside the midday window.
How do you capture movement with composition, posing and camera settings?
Getting it right in the camera matters more than fixing it later. Shutter speed and depth of field are the two controls that separate a sharp action frame from a muddy one.
- Freeze action: start at 1/500s and go faster for sprints, jumps and swings.
- Show motion: drop to roughly 1/30s to 1/60s and pan with the subject for deliberate blur.
- Shoot low: a low angle makes athletes look powerful and lifts them against the sky.
- Use the environment: leading lines such as paths, rails and shorelines pull the eye to the subject and show scale.
- Leave room to move: give space in the direction of travel so the frame doesn't feel cramped.
- Cue the effort: ask for a breath, a start, a burst of five reps. Real effort looks better than a forced smile.
If you want hands-on practice, sports photography workshops teach anticipation, light and shutter control.
What should you bring to an outdoor fitness shoot?
A short checklist keeps a session smooth, and our post on bringing two outfits to every photoshoot covers the wardrobe side in more detail.
- Wardrobe: layers, a neutral base and one accent colour. Skip large logos unless you need branded shots. Pack two outfits to double your variety.
- Photographer's kit: camera body, a wide lens and a short telephoto, spare batteries, memory cards, a reflector, a lightweight flash and water.
- Safety: sunscreen, a hat and a first-aid kit. Warm up before action frames so nobody strains a muscle for the sake of a jump shot.
Pro Tip: Pack outfit two in a separate bag so you can swap quickly while the light is still good.
What are the public-space rules for fitness shoots in New Zealand?
Photographing people in public is generally lawful. NZ Police guidance says this holds as long as the subject isn't somewhere they'd expect privacy and you don't stop others using the space. Changing rooms and similar areas are off limits.
Commercial or disruptive shoots are different. In Auckland, the Public Trading, Events and Filming Bylaw 2022 requires approval for many activities in council-controlled public places, including filming and the production and sale of personal portraits.
- Check the bylaw first if your shoot is commercial, uses large rigs or affects public access.
- Ground-affecting props: running a fitness session in a park needs landowner approval only when equipment digs into the ground.
- Parking and street use: reserving spaces requires a film parking permit.
Why is our guidance practical?
Rowan Freeman is a professional photographer with us at Life in Style Photography, working across fitness, branding, couples and wedding shoots in Auckland. You can see how these principles play out in our portfolio, and our wellness photoshoot ideas post adapts the same thinking for practitioners who want brand-led imagery.
How do you make outdoor fitness photos feel authentic?
Rapport does most of the work. We ask for short bursts of effort rather than long holds, and we keep shooting between the reps, because the breathless, laughing in-between moments are usually the keepers. A relaxed pace helps camera-shy clients forget the lens and look genuinely energised.
— Rowan Freeman
How we can help with your outdoor fitness shoot
We can deliver the 10-shot brief on location, with planning, wardrobe advice and relaxed on-set direction, so you don't need to know how to pose. Our fitness photography packages are The Mini Shoot at 460 NZD, The Standard Shoot at 570 NZD and The Premium Shoot at 800 NZD. Send us an enquiry with your goals and preferred location, and we'll confirm a time that suits the light.
FAQ
What is the best time of day for outdoor fitness photos?
Early morning and late afternoon give the softest, most flattering light. In New Zealand, these windows also keep you out of the peak UV hours, with guidance advising against 10 am to 4 pm from September to April.
What shutter speed freezes fitness action outdoors?
Start at 1/500s for general movement and go faster for sprints and jumps. Slower speeds around 1/30s suit panning shots where you want deliberate motion blur.
Do I need a permit to shoot outdoor fitness photos in Auckland?
Casual handheld shooting in public generally doesn't, but commercial or disruptive shoots may. Check the Auckland Council bylaw and ask the council or landowner before you book a location.
Can I use free outdoor fitness photos commercially?
Only if the licence says so. Check each image for commercial use, modification and attribution terms before publishing it in an ad or on a product page.
Sources
- What are the rules around taking photos or filming in a public place? | New Zealand Police
- Public Trading, Events and Filming Bylaw 2022
- Consensus Statement on Vitamin D and Sun Exposure in New Zealand
- Aucklandeconomicdevelopment