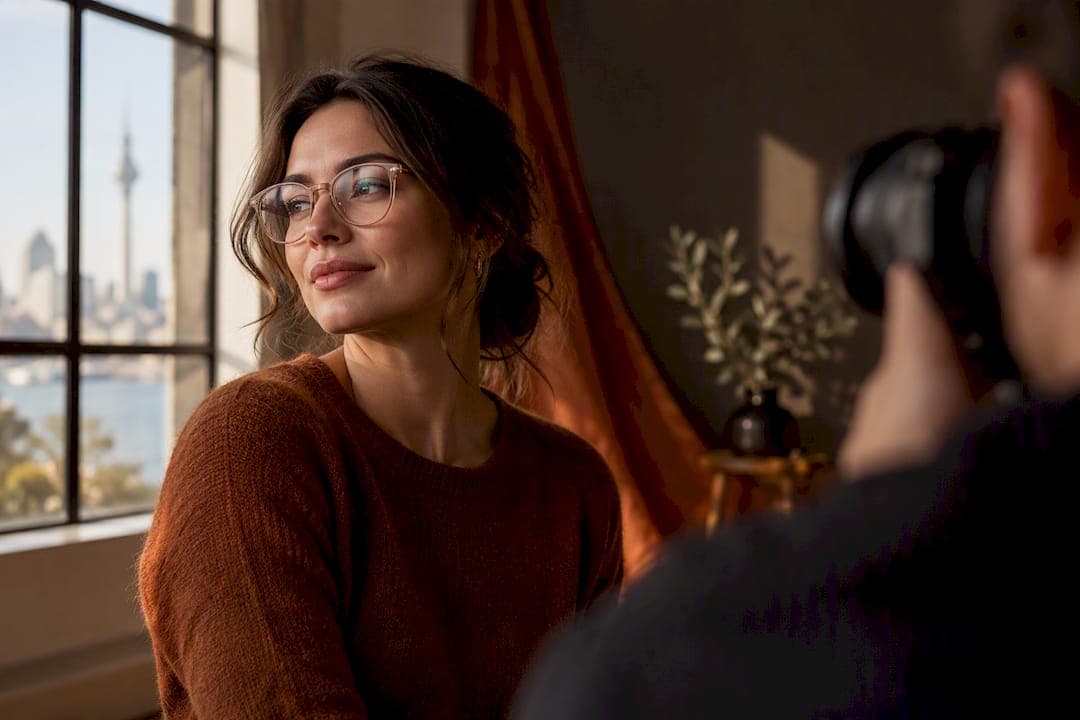
Keep your glasses on if you wear them daily. The trick isn't removing them, it's controlling light: raise your key light above eye level and offset it slightly so reflections bounce down and away from the lens. Clean your lenses, check for anti-reflective coating, and bring a spare pair if you have one.
TL;DR:
- Ensuring proper lighting angles, such as raising the key light above eye level and offsetting it, significantly reduces glare from glasses during photos.
- Small head tilts, slight rotations, and shifting gaze help move lens reflections out of the camera's line of sight without unnatural effects.
- Using clean lenses, bringing spare glasses, and checking for lens type and fit beforehand greatly improve photo quality when wearing glasses.
- Post-shoot retouching can fix minor reflections, but avoiding glare in-camera remains the most reliable and natural solution.
Table of Contents
- Pre-shoot checklist for glasses in photos
- How lighting and angles prevent glare from glasses
- Posing tricks that keep your eyes visible
- Which lenses and frames photograph best?
- Camera techniques that help with glasses glare
- What editing can and can't fix afterwards
- How Life in Style Photography handles glasses on set
- A photographer's honest take on glasses and photos
- Book a headshot session that handles glasses properly
- Sources
- FAQ
Pre-shoot checklist for glasses in photos
A few minutes of preparation before a headshot session or portrait sitting solves most glare problems before your photographer even picks up the camera. We ask every client who wears glasses to run through the same short list, whether they're booking a personal branding shoot or a quick portrait.
- Clean your lenses properly with a microfibre cloth right before shooting. Fingerprints and dust show up far more clearly under studio lighting than they do in everyday life, and they scatter light unpredictably.
- Bring a backup pair if you own one, even an older prescription. A second identical frame with the lenses popped out gives your photographer a fallback if the glare from your main pair proves stubborn.
- Check your lens type. Anti-reflective coatings cut glare dramatically, while photochromic (transition) lenses can darken under strong studio lights or flash, sometimes hiding your eyes entirely.
- Pack simple tools if you're comfortable with the empty-frame approach: a small screwdriver and spare screws mean lenses can go back in the moment the shoot wraps up.
- Wear your usual frames. A headshot in glasses you never actually wear looks off to anyone who knows you, and colleagues on LinkedIn notice more than you'd think.
None of this takes long, but it's the difference between spending half a session chasing a reflection and getting it right on the first few frames. If you want a broader rundown of what to prepare before any sitting, our pre-session preparation guide covers wardrobe and grooming too.
How lighting and angles prevent glare from glasses
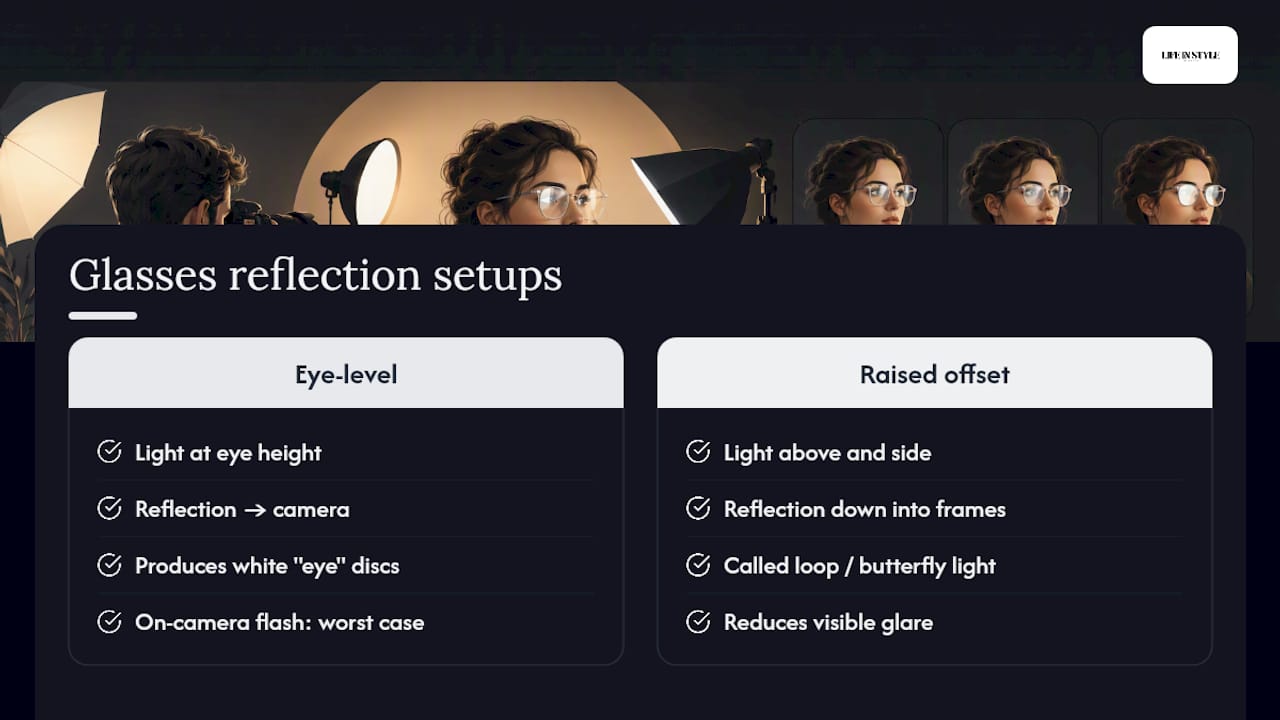
Glare on glasses follows a simple rule of physics: the angle of incidence equals the angle of reflection. Light bounces off a lens at the same angle it arrives, so wherever your key light sits relative to your face, its reflection will appear at the matching angle back toward the camera, unless you move one of the three points in that triangle: the light, the face, or the lens.
In a studio, that means positioning the main light above eye level and slightly to the side, in what photographers call loop or butterfly lighting. Raised and offset like this, the light's reflection bounces downward into the frames rather than straight back into the lens. Direct on-camera flash or a bare strobe placed at eye height is the worst possible setup for glasses. It sits at almost exactly the angle needed to reflect straight into the camera, which is why so many family photos and passport-style shots end up with two white discs where the eyes should be.
Natural light behaves the same way, just with softer edges. A north-facing window or a spot in open shade gives you a large, diffused light source, and diffused light produces a much fainter, easier-to-manage reflection than a small hard source like direct sun or a bare bulb. Backlighting, where the main light comes from behind or to the side of the subject rather than from in front, often avoids the problem altogether because there's no strong source sitting in the lens's direct reflection path.
If you're shooting on a phone rather than with a photographer directing lights, the same principle still applies. You just have fewer variables to work with. Instead of moving a light, you move yourself or the phone. If you're standing near a window, shift a step to the left or right rather than facing it head on. Watch the screen as you move. Reflections shift visibly and often disappear entirely with a small step sideways. Avoid pointing your camera directly at a strong single light source like a lamp or the sun low on the horizon, since that's the setup most likely to bounce straight back at you.
This is also where the anti-reflective coating on your lenses earns its keep. AR coatings can cut total surface reflections from around 8 to 10% down to less than 0.5%, according to Capturely's glasses photography guide, which is a genuinely large difference once you're standing under a 500 watt studio light. If your current lenses don't have that coating, lighting technique alone can usually still solve the problem in most studio sessions, but it gives you far less margin for error, and it's worth mentioning to your optician next time you're due for new lenses.
Pro Tip: If you're photographing yourself for a professional profile, try tilting your phone or laptop screen down a few degrees rather than moving your whole body. It's a smaller adjustment and easier to repeat consistently across several shots.
Posing tricks that keep your eyes visible
Fixing glare shouldn't mean pushing your glasses down your nose so the camera can see over the top. It looks unnatural, and it partially hides your eyes anyway, which defeats the purpose. The better fixes are small and mostly invisible in the final photo.
- Tilt the chin down a touch. A few degrees is usually enough to change the angle your lenses present to the light, without changing your expression or the overall pose.
- Rotate the head slightly. Turning 10 to 20 degrees left or right often clears reflections completely, and this range of movement is what most working photographers reach for first, according to Shotkit's posing guide for people who wear glasses.
- Shift your gaze rather than your glasses. Looking slightly to the side or down at a fixed point changes the angle without you touching the frames at all.
- Try a three-quarter angle. Turning the body and face slightly away from square-on to the camera is flattering for most people and happens to move lens angles out of the reflection zone.
- Use a hand-near-frame pose sparingly. Resting a hand near the temple (not on the lens) can work for personal branding shots, but it's a style choice, not a fix, so use it only when it suits the mood you're after.
- Let your photographer adjust the temple arms slightly. A tiny change in how the arms sit on your ears alters lens tilt in a way that's invisible in the final image but changes exactly where light bounces.
The real workhorse behind all of this is live preview. A good photographer checks the shot on-screen after the first frame or two and asks for a one or two degree adjustment rather than repositioning lights or moving furniture. It's a habit built from experience: small, fast corrections beat big, slow ones every time.
Which lenses and frames photograph best?
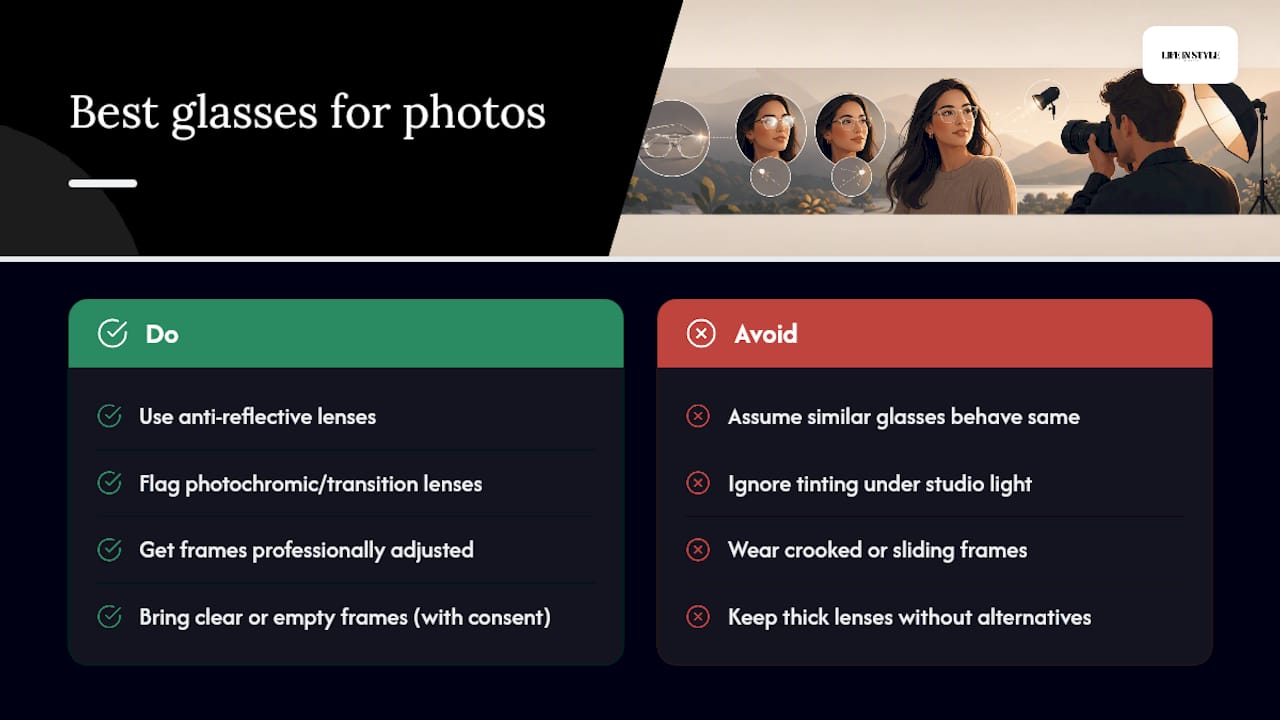
Anti-reflective coating is the single biggest factor in how well your glasses photograph. It's a thin coating applied to the lens surface that reduces the amount of light bouncing straight back at the camera, and it's the reason two people wearing seemingly similar glasses can produce completely different results under the same studio lights.
Transition or photochromic lenses are worth flagging separately, because they behave differently under artificial light than they do outdoors. Strong studio strobes or even bright window light can trigger a partial tint, giving you a faint sunglasses effect that obscures your eyes in the finished portrait. If you know your lenses do this, mention it to your photographer beforehand and bring a clear pair if one exists.
Frame fit matters more than most people expect. Glasses that sit crooked or slide down the nose create uneven reflections and an asymmetrical look that's hard to correct afterwards. A quick stop at your optician to have the frames adjusted and straightened before a shoot, particularly if you've owned them for years, is a five-minute fix that pays off in every photo.
For clients with strong prescriptions, thick lenses can distort eye size or position slightly, especially in high-resolution portraits where every detail is visible. In these cases, some photographers use empty frames (the same glasses with lenses temporarily removed) or a clear, non-prescription pair, so the subject keeps their familiar look with no distortion and no glare risk at all. It's a technique Fstoppers outlines in detail, and it requires care: a small screwdriver, somewhere safe to store the lenses, and clear consent from the client before anything gets removed. Done properly, it's low risk and reversible in minutes.
Camera techniques that help with glasses glare
Beyond lighting and posing, a few camera-side habits make glasses easier to photograph well. A slightly longer focal length, paired with stepping back from your subject, gives you more room to move the camera itself without changing the framing, and that extra flexibility often reveals an angle where reflections simply vanish.
Moving the camera off-axis, even by a small amount left, right, up, or down, changes the reflection geometry entirely while leaving your subject's pose untouched. This is often faster than adjusting lights, particularly on location where you can't always reposition a softbox easily.
Circular polarising filters can help with reflections from windows, water, or other environmental surfaces in the background, but they have real limits. A CPL filter does very little against direct on-camera flash or a bare studio strobe, and it can shift skin tones slightly, so it's a tool for specific situations rather than a universal fix.
Phone photography benefits from a couple of simple habits: shoot with the back camera rather than the front-facing one for sharper results, and if someone else is taking the photo, have them check the screen and call out reflections as they shoot rather than reviewing afterwards. Iterative checking, one small change at a time, works just as well on a phone as it does with professional lighting.
What editing can and can't fix afterwards
Small, faint reflections and minor hotspots on the edge of a lens can usually be softened in retouching without anyone noticing. It's a quick job with basic healing or cloning tools, provided the reflection is small and doesn't cover the pupil.
Large white glare spots sitting directly over the eye are a different problem entirely. According to PictureCorrect's guide to handling glasses reflections, these are genuinely difficult to remove naturally in post-production, and heavy retouching to paint them out often distorts the eye shape or leaves an obvious edit. The safest workflow is to get the shot right in-camera first, using the lighting and posing techniques already covered, and treat retouching as a backup for small residuals only. When an empty-frame or clear-pair swap has already removed the glare on set, there's usually nothing left to fix at all, which is the better outcome every time it's an option.
How Life in Style Photography handles glasses on set
Our approach starts before the camera comes out. We ask clients to bring a spare pair and a microfibre cloth, since a clean lens under studio light makes a visible difference in the first few test shots.
From there, it's the habits covered throughout this piece: a quick lens check, live preview after the opening frames, and small adjustments to head angle or light position until the reflection is gone. We check images often during a session rather than shooting a large batch and hoping, because a one or two degree chin change is far quicker than repositioning a light stand. If a client wants to try the empty-frame option, we only do it with clear consent and the right tools on hand, and it's entirely reversible once the shoot wraps.
You can see this approach across our Auckland headshot portfolio, including plenty of subjects photographed in their everyday glasses.
A photographer's honest take on glasses and photos
Glasses aren't a problem to be solved. For a lot of people, they're simply part of how they look and how they want to be recognised, and a photo without them can feel less like them, not more polished. The techniques in this piece exist because glare is a lighting problem with a lighting solution, not because glasses themselves are difficult to photograph.
What I'd genuinely encourage is talking to your photographer before the shoot, not just during it. If a past session left you with two white discs where your eyes should be, say so. Bring your options, tell us what's bothered you before, and let the person behind the camera do the small, fast adjustments that actually fix it. That collaboration matters more than any single technique.
— Rowan Freeman
Book a headshot session that handles glasses properly
If you wear glasses and want a professional headshot without the guesswork, consider headshot packages built around quick lens checks, live preview, and small on-set adjustments until the glare is gone. The Short one at $345 NZD suits a fast, focused session, while The Standard one at $575 NZD gives you more time to try a few looks, glasses on and off, and compare results on the spot. Businesses updating a whole team's profile photos can look at the Half day Office photoshoot at $2,300 NZD.
Booking starts with a quick enquiry through our headshot photography services page, where you can check availability and get a custom quote. Bring your usual glasses, a spare pair if you have one, and a cloth, and we'll take care of the rest on the day.
Sources
For more detail on the techniques covered here, Capturely's glare-free tips guide breaks down AR coating statistics and lighting setups. Shotkit's posing guide offers further pose ideas beyond headshots, and for group shots, this posing roundup has practical ideas worth adapting. PictureCorrect covers retouching limits in more depth.
- How to pose people with glasses: a photographer’s guide
- How to handle catch lights and eyeglasses glare in portrait photography
FAQ
Should you wear glasses in photos?
Yes, if you wear them daily, keeping them on gives a more authentic result and avoids the slightly unfamiliar look that glasses-free photos can have for people who normally wear them. If you're unsure, ask your photographer to shoot a few frames both ways and compare on the spot.
How do I stop glare from glasses in photos?
The most reliable fix is controlling your light angle: raise the key light above eye level and offset it to the side so reflections bounce down and away from the camera. Small head tilts of a few degrees or turns of 10 to 20 degrees usually clear any remaining reflection.
How do I take photos if I wear glasses?
Clean your lenses right before shooting, check whether you have anti-reflective coating, and avoid facing directly into a single strong light source like a window or lamp. On a phone, watch the screen as you shift position slightly, since reflections often disappear with a small step sideways.
Can editing fix glasses glare after the shoot?
Small, faint reflections can usually be softened in retouching without it looking obvious. Large white glare spots directly over the eye are difficult to remove naturally, so it's best to fix the reflection in-camera during the shoot rather than relying on editing afterwards.