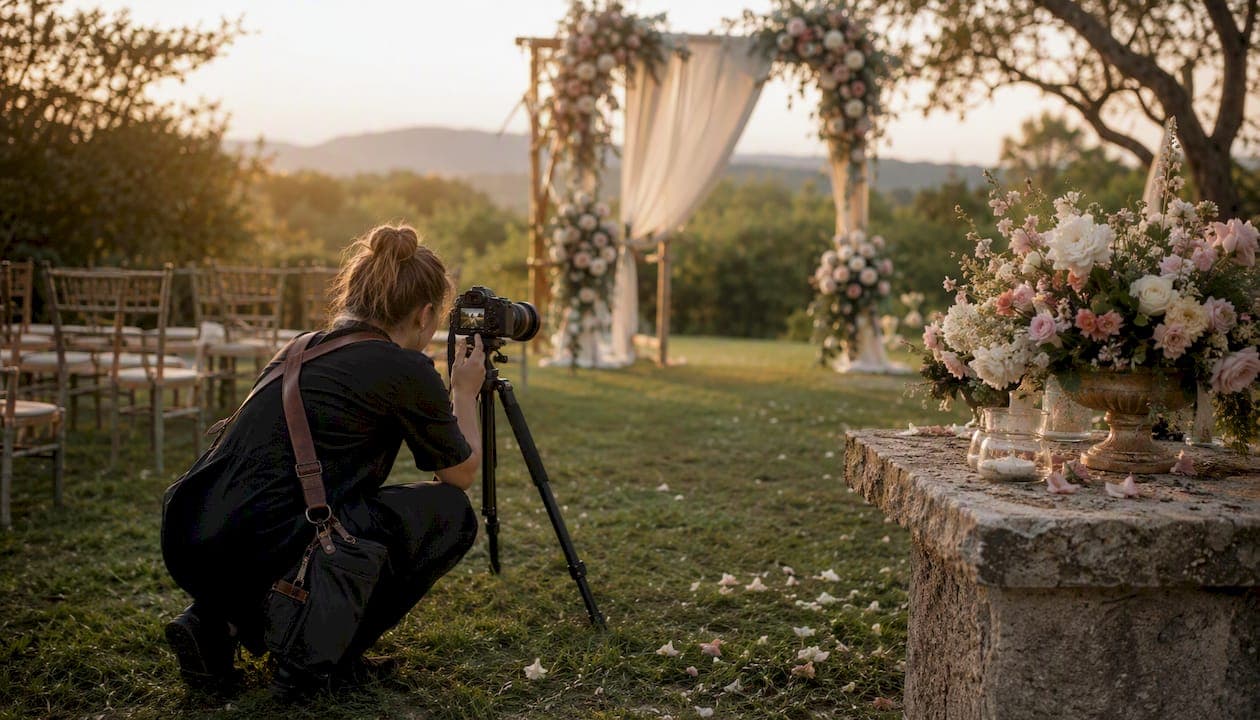
A well-planned wedding photo timeline typically covers the full day, flowing from getting-ready details through to the first dance, with clear time blocks protecting every key moment. Copy this one-line sample and adjust to your day:
9:00 AM Getting ready (bride) | 10:30 AM Getting ready (groom) | 11:30 AM First look (optional) | 12:00 PM Ceremony | 12:45 PM Family photos | 1:30 PM Bridal party portraits | 2:15 PM Couple portraits | 5:30 PM Golden hour portraits | 6:00 PM Reception entrance | 6:30 PM Speeches | 7:30 PM First dance
Three moments every timeline should protect, no matter how short the day:
- Getting-ready details (rings, dress, florals, candid moments with the wedding party) — these set the emotional tone of the whole album
- Couple portraits — reserve sufficient time, ideally split across two windows if golden hour is available
- Formal family photos — block reasonable time and prepare a written list in advance
For a ready-made template you can hand straight to your vendors, Life in Style Photography's wedding services include timeline planning support with every package.
Key takeaways
A well-structured wedding photo timeline anchors every block to the reception meal time, protects at least 30–45 minutes for couple portraits, and reserves a dedicated golden hour slot based on the exact sunset time for your venue and date.
| Point | Details |
|---|---|
| Anchor to meal time | Work backwards from reception mains to set ceremony, portrait, and getting-ready times. |
| Protect couple portrait time | Reserve 30–45 minutes minimum; split across two windows when golden hour is available. |
| Pre-write the family list | List groups in order with short first names so the photographer can move through them quickly. |
| Check golden hour for your venue | Use MetService or a sun-times calculator for your exact venue location and wedding date. |
| Life in style Photography | Includes timeline planning support with every Auckland wedding package. |
Table of Contents
- What does a minute-by-minute wedding photo timeline look like?
- How do you build your own wedding photography schedule?
- First look or no first look: which works better for your day?
- How long do family photos actually take?
- How to build sensible buffers into your wedding day
- Why golden hour matters for your New Zealand wedding portraits
- What should you give your photographer before the wedding?
- Ready-made timeline templates you can download and adapt
- How I plan timelines with couples
- Life in style Photography: wedding timeline planning in Auckland
- Useful resources and tools for New Zealand couples
- Sources
What does a minute-by-minute wedding photo timeline look like?
Three common schedule types cover typical coverage lengths. Pick the one closest to your plan, then adapt the time blocks to suit your venue and vendors.
Micro wedding timeline
A compact day means ruthless prioritisation. Keep the ceremony, a tight family photo block, and one solid couple portrait session. Drop the extended bridal party session and the second portrait window.
| Time | Block | Duration |
|---|---|---|
| 2:00 PM | Couple getting-ready details and final prep | 20 min |
| 2:20 PM | Ceremony | 30 min |
| — | Family photos (up to 8 groups) | 30 min |
| 3:15 PM | Couple portraits | 30 min |
| 3:45 PM | Reception entrance and cake | 15 min |
Key micro-wedding rules:
- Limit family groups to 8 or fewer; more than that and you need a longer package
- Skip the bridal party session or fold it into the couple portrait block
- Choose a venue where ceremony and portrait locations are within walking distance
Half-day timeline
This is a popular format for New Zealand couples who want genuine coverage without a full-day commitment. Sample timelines from professional photographers recommend allocating appropriate time for family photos, bridal party portraits, and couple portraits, depending on travel and golden hour access.
Full-day timeline
A full-day schedule provides ample time including a golden hour session and coverage of reception highlights well into the evening.
How do you build your own wedding photography schedule?
Converting a sample timeline into one that actually fits your day takes about six decisions. Work through them in order and your schedule will hold up under real conditions.
Start with your reception meal time and work backwards. Meal service is the one fixed point that caterers, venues, and AV teams all anchor to. Once you know when mains are served, you can count backwards to set ceremony start, photo blocks, and getting-ready call times. Working backwards from the meal is the method most experienced wedding planners and photographers use to build a timeline that doesn't collapse mid-afternoon.
Decide on first look vs no first look. This single choice shifts every other block (more on this in the next section). Make the call early so the rest of the schedule can be built around it.
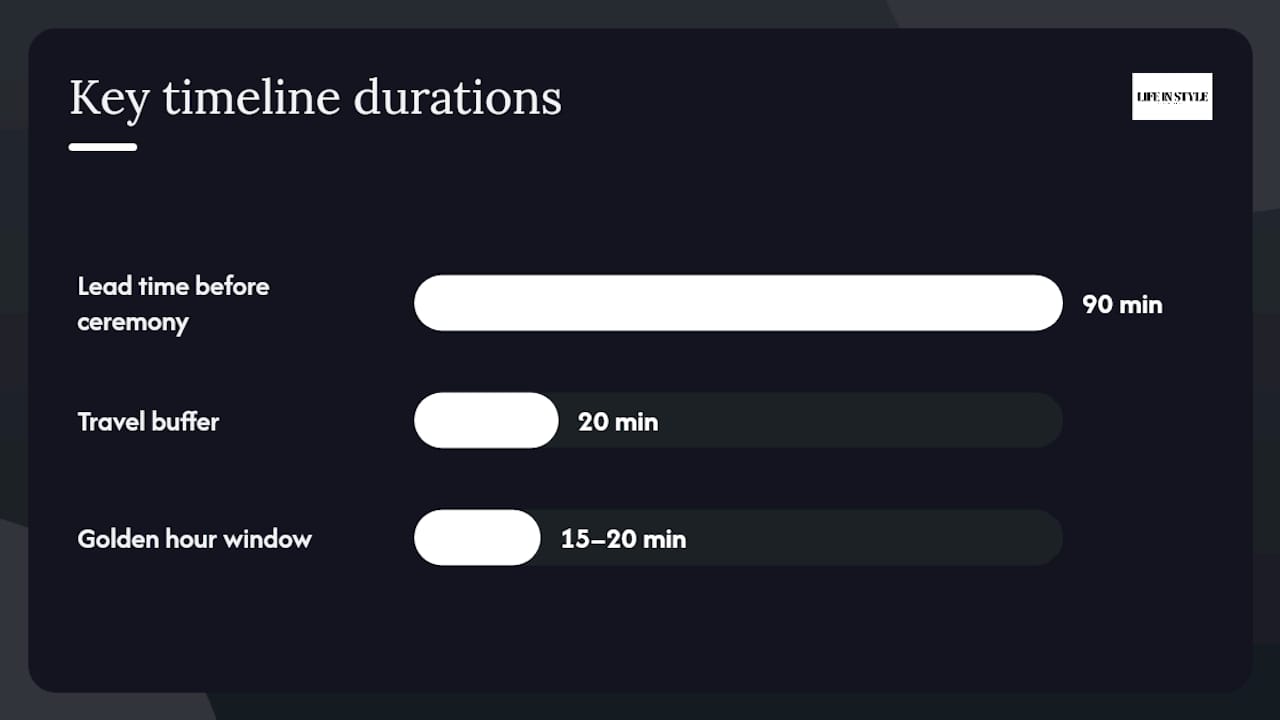
Estimate travel and setup buffers honestly. A 10-minute Google Maps drive becomes 20 minutes with a wedding party in formal wear, a bridal car, and a photographer loading gear.
Answer these six questions before you finalise anything:
- How long is the ceremony (civil, religious, cultural)?
- How many family groups are on your photo list?
- How many portrait locations are you using?
- How large is the bridal party?
- What is the travel time between each location?
- Do you want a golden hour couple portrait session?
Numbered steps to build your custom timeline:
- Write down your reception meal time and work backwards to set the ceremony end time.
- Add your ceremony duration to find the ceremony start time.
- Block family photos immediately after the ceremony (guests are still assembled and dressed).
- Add bridal party portraits, then couple portraits, then travel buffers.
- Slot getting-ready coverage so the photographer arrives at least 90 minutes before the ceremony for a full-day package.
- Check your golden hour time for the venue date and reserve a 15–20 minute window for couple portraits near sunset.
Pro Tip: To shorten family photo time without losing key shots, ask your photographer to shoot the largest groups first, then break them down into smaller combinations. You get more variety with fewer setups, and guests are released sooner.
Your photography style preference also affects timing. A reportage-style photographer needs less directed portrait time; an editorial approach typically requires longer, more structured blocks. Clarify this with your photographer before locking the schedule.
First look or no first look: which works better for your day?
This is one of the most practical decisions you'll make when building your wedding day photo timeline, and it has a direct knock-on effect for every other block.
With a first look
Portrait time moves before the ceremony. You complete couple portraits, most of the bridal party shots, and sometimes even family photos before guests arrive. Post-ceremony, you go straight to the reception.
Mini timeline (first look):
- 11:00 AM First look and couple portraits (40 min)
- 11:40 AM Bridal party portraits (30 min)
- 12:10 PM Family photos (30 min)
- 1:00 PM Ceremony
- 1:45 PM Reception (minimal photo delay)
Pros:
- Frees up the post-ceremony schedule entirely
- Couples are calmer and more relaxed during portraits
- Ideal when the reception venue is far from the ceremony
Cons:
- Removes the traditional reveal moment at the altar
- Requires earlier getting-ready call times
- Needs strong coordination between hair/makeup and the photographer
Without a first look
All portraits happen post-ceremony, which compresses the afternoon and can push couple portraits close to golden hour by default.
Mini timeline (no first look):
- 12:00 PM Ceremony
- 12:45 PM Family photos (30 min)
- 1:15 PM Bridal party portraits (30 min)
- 1:45 PM Couple portraits (40 min)
- 3:00 PM Reception entrance
Pros:
- Preserves the emotional reveal at the ceremony
- Simpler morning schedule for getting ready
- Works well for shorter ceremonies with nearby portrait locations
Cons:
- Compresses all portrait time into one post-ceremony window
- Any ceremony overrun eats directly into portrait time
- Harder to access golden hour unless the reception runs late
A first look is worth serious consideration when your reception venue is more than 30 minutes from the ceremony, if you have a tight evening schedule, or if winter daylight hours are short (a real factor for New Zealand weddings from May through July).
How long do family photos actually take?
Family photos routinely run over time, and the reason is almost always the same: no one knows the order, and guests wander off between groups. A simple formula and a bit of pre-planning fixes this.
Recommended order: Start with the largest group (everyone together), then break into smaller combinations. Move from the couple's immediate families outward to extended family and friends. This releases guests progressively rather than holding everyone until the end.
Timing formula: Allow 3 minutes per standard group (up to 6 people) plus 30 seconds for each additional person. A list of 10 groups averaging 6 people each takes roughly 30 minutes. Add 5 minutes as a buffer for any group that needs rounding up.
Speed tricks photographers rely on:
- Assign a family liaison (a sibling or close friend who knows everyone) to call groups by name
- Give the liaison a printed copy of the group list in order
- Shoot in a location where guests naturally gather after the ceremony
- Use a clear, loud voice or a runner to call the next group while the current one is still being photographed
Pro Tip: When you write your family photo list, use short first names only and list each group on a separate line. "Mum, Dad, Sarah, Tom" is faster to read aloud than "Bride's parents and siblings." Your photographer will move through the list twice as quickly.
How to build sensible buffers into your wedding day
Buffers are not padding. They are the difference between a timeline that holds and one that unravels by 2:00 PM.
Travel time guidelines:
- Short transfer (under 15 minutes): add 10 minutes buffer
- Medium transfer (15–45 minutes): add 15–20 minutes buffer
- Long transfer (45 minutes or more): add 30 minutes buffer and consider whether a second portrait location is worth the time cost
Hair and makeup scheduling: The photographer should arrive while hair and makeup is still in progress, not after it's finished. The final 30–45 minutes of getting ready produces some of the most natural, candid images of the day. Coordinate with your hair and makeup artist so the photographer's arrival overlaps with the last person being finished, not the first.
Weather contingency: New Zealand weather changes quickly, particularly in Auckland and coastal regions. Identify a covered or indoor alternative for each outdoor portrait location before the day. If you need to move to the backup location, add 15 minutes to the travel buffer for that block. Agree on a decision time with your photographer (typically 30–60 minutes before the portrait session) so everyone can reposition without rushing.
Risk mitigation for common delays:
- Late hair/makeup: build a 15-minute float into the getting-ready block rather than starting the ceremony block immediately after
- Late vendors: confirm arrival times with all vendors 48 hours before the wedding and share the run sheet with each of them
- Oversized bridal parties: add 5 minutes per additional person beyond 6 in the bridal party portrait block
Why golden hour matters for your New Zealand wedding portraits
Golden hour, the 30–60 minutes after sunrise and before sunset, produces soft, warm, directional light that flatters skin tones and creates depth in portraits. For couple portraits specifically, it's the most forgiving and beautiful light of the entire day.
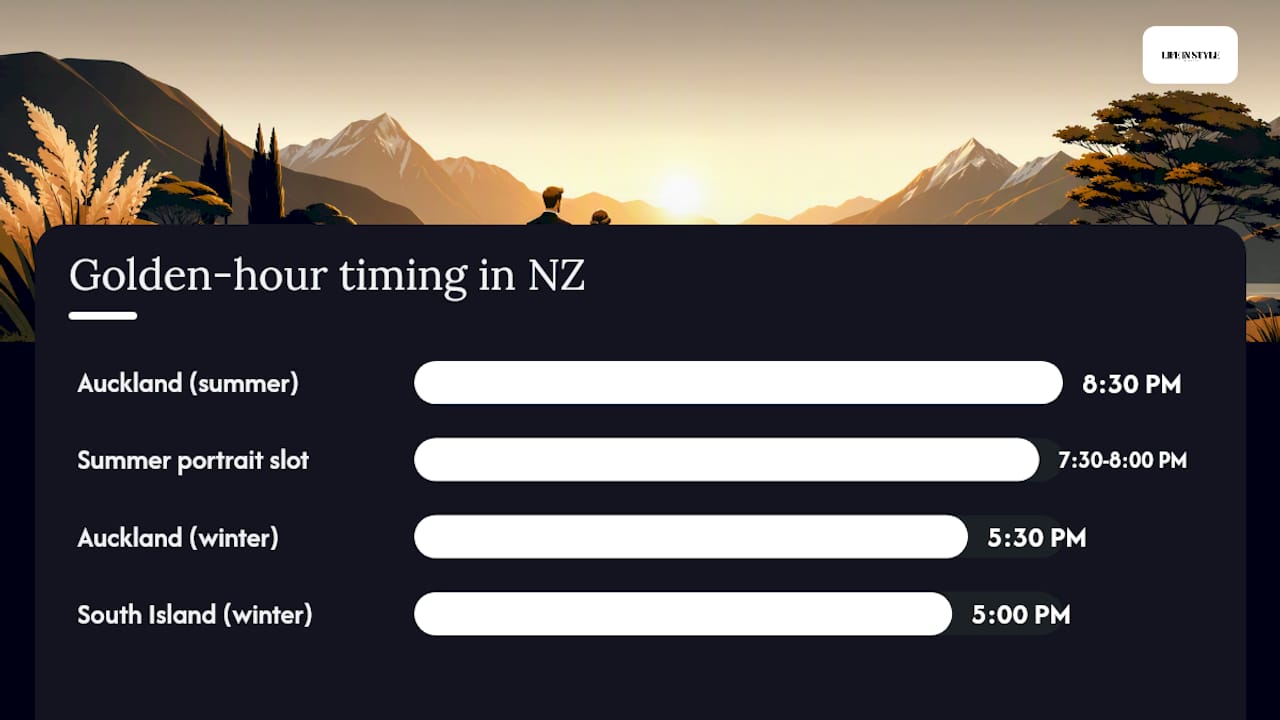
New Zealand's seasonal variation is significant. In Auckland, summer sunset can fall as late as 8:30 PM, giving you a long golden hour window well into the evening. In winter, sunset can arrive before 5:30 PM, which means golden hour portraits need to be scheduled earlier in the reception, sometimes before speeches. For couples marrying in Queenstown, Christchurch, or the South Island, the variation is even more pronounced.
Check the exact sunset time for your venue location on your wedding date. A sun-times calculator lets you look up sunrise and sunset by location and date. Use it for your specific venue coordinates, not just the nearest city, because even 30 kilometres of distance can shift the time by several minutes. MetService is New Zealand's national weather service and provides both forecast conditions and daylight information for planning purposes.
Seasonal planning notes for New Zealand:
- Summer (December–February): Long daylight hours give flexibility; golden hour falls late, so plan couple portraits around 7:30–8:00 PM for outdoor receptions
- Autumn (March–May): Sunset moves earlier each week; check the exact date rather than assuming a general window
- Winter (June–August): Sunset can be as early as 5:00 PM in the South Island; schedule golden hour portraits before speeches if possible
- Spring (September–November): Daylight extends rapidly; conditions are often ideal with soft cloud cover
Pro Tip: Reserve a dedicated 10–20 minute golden hour slot in your photographer's block, even if you've already done couple portraits earlier in the day. The light at this time is genuinely different, and the images from a 15-minute golden hour session often become the couple's favourite shots from the entire wedding.
What should you give your photographer before the wedding?
A concise, well-organised information packet means your photographer can focus on capturing moments rather than chasing details on the day. Keep it to one page if possible.
What to include:
- Ceremony start time and venue address (with parking notes)
- Reception venue address and contact name/phone number
- Car arrival times for the bridal party
- Family photo list in order (short names, one group per line)
- 3–5 must-have creative shots for the couple (specific locations, details, or moments)
- Name and phone number of the family liaison for group photos
- Any venue restrictions on photography (flash restrictions, restricted areas, permit requirements)
Format tips: Use a simple table or numbered list. Group the information under clear headers: Ceremony, Family Photos, Couple Portraits, Reception. Your photographer should be able to scan it in under two minutes. If you're using multiple locations, note the travel time between each one.
Attach the full run sheet as a second page. A printed copy is more reliable on the day than a phone screen, particularly in bright outdoor light. If your venue or a portrait location requires a permit or prior permission, note this on the run sheet and confirm it's been arranged.
Ready-made timeline templates you can download and adapt
Three template formats match the three coverage lengths covered earlier: micro (2–4 hours), half-day (5–6 hours), and full-day (8–10 hours). Each includes a single-page photographer checklist.
Adapting each template:
- Micro template: Compress the family photo block to 20 minutes maximum and remove the bridal party portrait row if the party is larger than 4 people
- Half-day template: Lengthen the couple portrait block by 15 minutes if you're using two locations; shorten the getting-ready block if the photographer is arriving at a venue where setup is already complete
- Full-day template: Add 30 minutes to the reception block if speeches are likely to run long; shift the golden hour slot earlier in winter months
File formats and sharing:
- Google Sheets templates let you enter your ceremony time and auto-calculate the rest of the run sheet; share directly with vendors via a view-only link
- Printable PDF versions are formatted for A4 and can be handed to the venue coordinator, hair and makeup artist, and MC on the morning of the wedding
- Send the run sheet to every vendor at least one week before the wedding, and confirm receipt with each of them
A downloadable Google Sheets timeline generator, where you enter a few key times and the sheet auto-populates the rest of the schedule, is one of the most practical tools available for couples building their first run sheet.
How I plan timelines with couples
When I sit down with a couple to build their wedding photography schedule, the first question is always about the reception meal time. Everything else follows from that anchor point. From there, we work through the six key decisions: ceremony length, family group count, portrait locations, bridal party size, travel, and golden hour preference.
For a typical Auckland wedding with a 1:00 PM ceremony, a two-location day, and a 6:00 PM reception, the schedule usually lands at around 8 hours of coverage. The golden hour slot at around 5:30 PM consistently produces the images couples return to most often. Protecting that window, even when the afternoon runs slightly behind, is one of the most consistent pieces of advice I give.
If you'd like a personalised timeline built around your specific day, get in touch with Life in Style Photography and we'll work through it together.
Life in style Photography: wedding timeline planning in Auckland
Life in style Photography offers Auckland couples more than just a photographer on the day. Every wedding package includes timeline planning support, a template handover, and clear communication with your other vendors so the photography schedule integrates with the full run sheet rather than competing with it.

The relaxed, natural approach that defines Life in style Photography's wedding and couples portfolio comes directly from a well-structured day. When the timeline is clear, couples feel calm, and calm couples produce the most genuine, emotive images. That's the practical reason timeline planning is built into every package, not offered as an afterthought.
To see the full range of wedding photography packages or to request a personalised timeline consultation, reach out via the website and we'll start with your date and venue.
Useful resources and tools for New Zealand couples
- MetService — New Zealand's national weather service; use it to check forecast conditions and plan weather contingency for outdoor portrait sessions
- Sunrise-and-sunset — look up exact sunrise and sunset times by location and date to lock in your golden hour portrait slot
- Wedding photography styles guide — explains how your preferred photography style affects portrait block length and placement
- Brides — a widely referenced sample timeline with minute allocations for ceremony, family photos, bridal party portraits, and couple portraits