A RAW file is your camera's unprocessed negative, holding every bit of data the sensor captured. An edited photo, usually a JPEG, is that same data compressed and finished in-camera. Choose RAW when the shot matters and you need room to fix exposure or colour. Choose JPEG when you need speed, smaller files, and nothing to edit later.
- Critical work (weddings, branding, portraits you'll sell or print): shoot RAW
- Learning to edit or fixing tricky exposures: shoot RAW
- Fast delivery, tight storage, or long bursts: shoot JPEG
The rest of this guide walks through the technical reasons behind that verdict, then gives you a workflow to turn RAW files into polished, shareable images.
Key Takeaways
RAW files give photographers roughly four stops of editing recovery against one stop for JPEG, making RAW the stronger choice whenever the shot has to count.
| Point | Details |
|---|---|
| Shoot RAW for critical work | Weddings, portraits, and branding shoots benefit from the extra recovery room RAW provides. |
| Mind the file size gap | RAW files run 30 to 80MB versus 5 to 20MB for JPEG, so plan storage and backups accordingly. |
| Use a non-destructive workflow | Edit through catalogues or XMP sidecars so your original RAW file never gets overwritten. |
| Protect ownership with metadata | Embed copyright information before export and keep RAW originals as proof of authorship. |
| Let professionals handle it | Life in style Photography shoots and edits in RAW, then delivers polished JPEGs, with RAW files available on request for commercial licensing. |
Table of Contents
- Raw vs edited photos: what each file actually contains
- The technical differences that actually change your results
- Pros and cons: RAW vs JPEG in real shooting conditions
- From RAW file to finished image: the editing workflow
- Which programs actually open and edit RAW files
- When RAW earns its keep, and when JPEG is the smarter call
- Should you hand clients the RAW files?
- File sizes and exposure recovery, in real numbers
- How metadata behaves differently in RAW and edited files
- Backing up RAW files without losing your mind (or your data)
- Fixing common RAW editing problems
- If you want professionally edited photos without the storage headache
- Sources
Raw vs edited photos: what each file actually contains
A RAW file is the digital equivalent of an undeveloped negative. It stores unprocessed sensor data with no sharpening, no compression, and no colour profile baked in, which is exactly why editors and photographers still call it "the negative" decades after film left the mainstream. Every camera brand names its RAW format differently. Canon shooters see CR2 or CR3 files, Nikon uses NEF, Sony saves as ARW, and Fujifilm writes RAF. Adobe's own DNG format tries to standardise the mess across brands.
A JPEG, by contrast, is what the camera decides your photo should look like. It applies sharpening, noise reduction, a colour profile, and lossy compression, then locks those choices into a much smaller file.
- RAW needs software before you can share it anywhere
- JPEG is ready to text, upload, or print the moment it leaves the card
- RAW keeps every editing option open; JPEG has already made those decisions for you
That difference, editable versus finished, is the entire reason this comparison exists.
The technical differences that actually change your results
Dynamic range is where RAW earns its reputation. A RAW file typically holds around four stops of exposure recovery, while a JPEG gives you roughly one stop before highlights blow out or shadows turn to mush. That gap is the difference between rescuing an underexposed ceremony shot and binning it.
By the numbers: RAW files typically carry 12 to 14 bits of colour depth compared to an 8-bit JPEG, translating to billions more tonal values per channel. That extra depth is what stops smooth skies and skin tones from banding when you push contrast or colour grading hard.
- Dynamic range: RAW recovers blown highlights and blocked shadows; JPEG mostly can't
- Bit depth: more tonal values in RAW means smoother gradients under heavy editing
- White balance: fully non-destructive in RAW, baked in for JPEG
- In-camera processing: sharpening and compression are applied to JPEG automatically, but RAW leaves those calls to you
The Sony support documentation on RAW files makes the same point manufacturers rarely advertise loudly: every JPEG is already a finished interpretation, not a neutral capture.
Pros and cons: RAW vs JPEG in real shooting conditions
Neither format wins outright. It depends on what you're shooting and how much time you have afterwards.
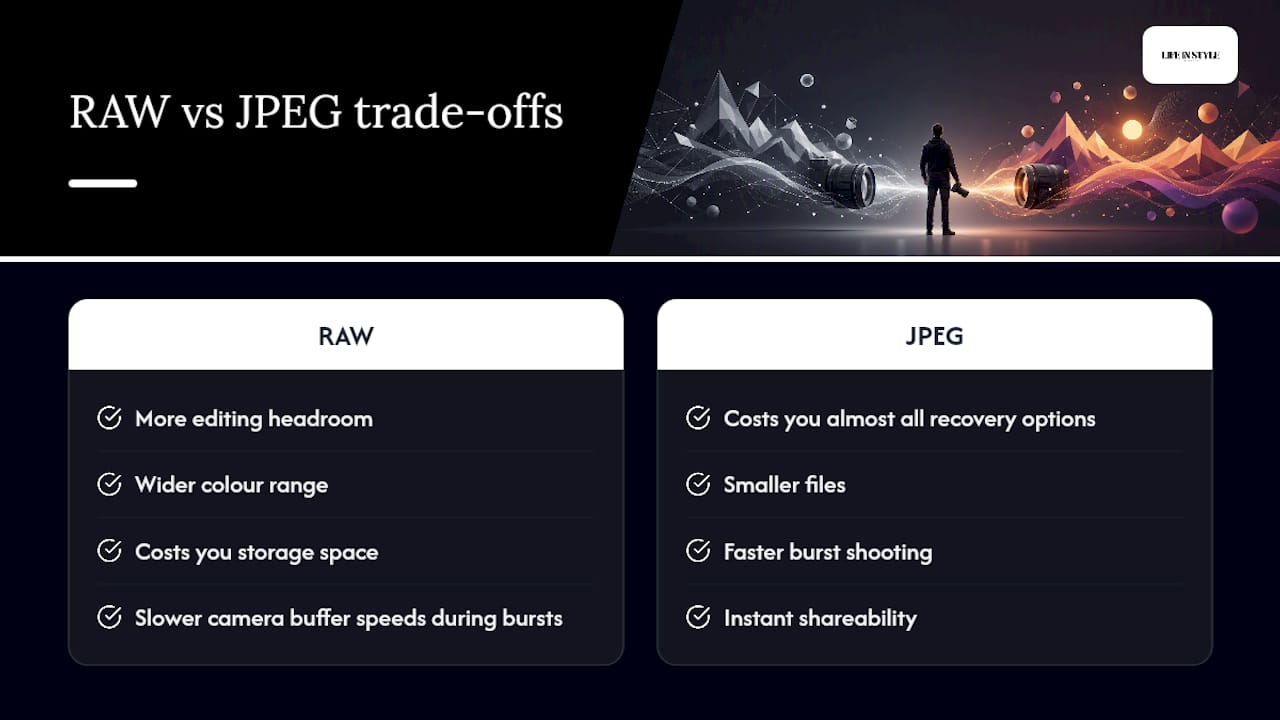
RAW gives you more editing headroom, wider colour range, and the ability to recover mistakes that would otherwise sink a shot. Files are also lossless, so repeated edits don't degrade quality the way re-saving a JPEG can.
RAW costs you storage space, slower camera buffer speeds during bursts, longer processing time before delivery, and occasional compatibility headaches with older or third-party software.
JPEG gives you instant shareability, smaller files, and faster burst shooting when your camera doesn't have to write huge files to the card.
JPEG costs you almost all your recovery options. Blow a highlight or misjudge white balance and there's often no getting it back.
Pro Tip: Shoot RAW+JPEG together for weddings and events. You get instant previews to share with clients on the day, while keeping the RAW originals for the real edit later. Just budget for the storage.
From RAW file to finished image: the editing workflow
Turning a RAW file into something client-ready follows a fairly consistent order, whichever software you use.
- Ingest and back up every file before you touch anything, ideally to two separate drives
- Cull your selects first, so you're not wasting editing time on shots that won't make the cut
- Make global adjustments, exposure, white balance, contrast, before anything local
- Apply local edits, masks, healing, dodge and burn, once the base exposure is right
- Sharpen and reduce noise as a near-final step, not the first thing you touch
- Export with the correct colour space (usually sRGB for web), file format, resolution, and output sharpening applied
Non-destructive editing matters here. Most RAW editors don't overwrite your original file. Lightroom stores edits in its catalogue or as XMP sidecar files, so the RAW itself never changes no matter how many times you rework it. Converting to Adobe's DNG format folds those edit instructions into one file, which some photographers prefer for long-term archiving.
Pro Tip: For bulk selections, sync your global adjustments across similar shots first, then go back and fine-tune only the images that need individual attention. It's the difference between editing 400 wedding photos in a weekend and still being at it a month later.
Which programs actually open and edit RAW files
Adobe dominates this space for good reason. Lightroom and Adobe Camera Raw (built into Photoshop) handle nearly every camera's RAW format and sync edits across devices. If your software doesn't recognise a newer camera's RAW files, Adobe DNG Converter is a free fix that translates proprietary formats into the universal DNG standard, addressing the compatibility gaps that crop up with every new camera release.
If you'd rather not pay a subscription, Darktable and RawTherapee are free, open-source alternatives with genuinely capable tools, Darktable's colour zones module in particular rivals paid software for local colour adjustments. Most of these tools run on desktop only, so factor that into your workflow if you shoot and cull on a tablet.
When RAW earns its keep, and when JPEG is the smarter call
Shoot RAW for portraits, landscapes, studio sessions, and any job where a client is paying for the final result. Tricky lighting, mixed colour temperatures, and once-only moments all favour RAW's recovery options.
- Studio and portrait work, where retouching demands maximum tonal control
- Weddings and events, where you can't reshoot a missed moment
- Landscapes with high dynamic range between sky and ground
JPEG makes sense for sports bursts where buffer speed matters more than editing latitude, casual family photos, or any job with a same-day turnaround. A hybrid RAW+JPEG setup covers most middle-ground scenarios, just watch your card capacity.
Should you hand clients the RAW files?
Most professional photographers keep RAW files to themselves, and it's not about being precious. Unedited RAWs don't represent the photographer's finished style, they're enormous to transfer, and the client usually doesn't have software that opens them anyway.
A fair compromise: deliver edited JPEGs as standard, offer select RAW files on request for an agreed fee, and put it in writing. A simple contract clause covering "delivered images" versus "source files" protects both sides from confusion, and retaining RAW originals gives you proof of authorship if ownership is ever questioned.
Pro Tip: Spell out image count and file type in your contract before the shoot, not after. "50 edited JPEGs" is a clear deliverable; "the photos" is an argument waiting to happen.
Do clients ever need the RAW files? Rarely, unless they plan to print at a scale requiring specific colour profiling, or they've specifically contracted for source files as part of a commercial licensing deal.
File sizes and exposure recovery, in real numbers
By the numbers: RAW files typically run 30 to 80 megabytes each, against 5 to 20 megabytes for a JPEG. Shoot a full day of weddings in RAW and you're looking at hundreds of gigabytes before you've even started editing.
That size difference has real consequences for gear and workflow.
- A 128GB card holds roughly 1,600 to 4,000 RAW files, depending on your camera's resolution
- Back up to at least two locations, an external drive plus cloud storage is a sensible minimum
- Budget backup time into your schedule, transferring 80GB of RAW files takes considerably longer than the JPEG equivalent
The four stops of exposure recovery available in RAW versus roughly one stop in JPEG is the number that justifies all that extra storage. It's the difference between saving a shot and deleting it.
How metadata behaves differently in RAW and edited files
Metadata tells the story of how a photo was made, and RAW and JPEG handle it in noticeably different ways. A RAW file stores camera settings (aperture, shutter speed, ISO, lens used), timestamp, and often GPS data as EXIF metadata embedded at capture. Crucially, that original metadata stays untouched throughout editing because RAW edits are non-destructive, recorded separately in a catalogue or XMP sidecar file rather than written into the original.
When you export to JPEG, your editing software typically carries over the original EXIF data and adds its own layer: colour profile, any keywords or captions you've applied, and sometimes copyright information you've set up in your editing catalogue. This is where photographers should pay attention. Stripping metadata on export (many platforms do this automatically for privacy) removes useful information but also erases copyright tags that help prove ownership if an image gets used without permission.
For working photographers, embedding copyright metadata before export is worth the extra thirty seconds. Lightroom, Darktable, and RawTherapee all let you set a copyright template that applies to every export automatically. It won't stop someone from screenshotting a photo off social media, but it does mean the ownership information travels with the file wherever it legitimately gets shared or printed.
One practical wrinkle: converting RAW to DNG format preserves the original metadata while adding Adobe's edit instructions into the same file, useful for archiving, but check that your workflow doesn't silently drop location data if privacy is a concern for client work.
Backing up RAW files without losing your mind (or your data)
RAW's biggest practical downside isn't the editing curve, it's the sheer volume of data. A weekend wedding shoot easily produces 300 to 500GB of RAW files once you count multiple cameras and reshoots, and that adds up fast across a busy season.
The standard advice among working photographers follows a version of the 3-2-1 rule: three copies of your files, on two different types of storage, with one copy kept somewhere off-site. In practice, that usually looks like your camera card, an external hard drive at home, and a cloud backup or a second drive stored elsewhere entirely.
A few habits make this manageable rather than overwhelming:
- Never format a card until you've confirmed two successful backups exist elsewhere
- Use separate drives for originals and working edits, so a corrupted edit doesn't touch your source files
- Label and date folders consistently (shoot date plus client name works well) so you're not hunting through unnamed folders a year later
- Check backup drives periodically, external drives fail more often than people expect, usually without warning
For anyone shooting professionally, cloud storage costs scale quickly with RAW file sizes, so many photographers keep only recent and unedited work in the cloud, archiving older completed jobs to physical drives kept in a second location. It's not glamorous work, but it's the difference between a drive failure being an inconvenience and it being a disaster.
Fixing common RAW editing problems
Most RAW headaches fall into a handful of predictable categories, and nearly all of them have straightforward fixes.
Corrupted RAW files usually happen from a card failing mid-write, pulling a card before it's finished saving, or a battery dying during transfer. Try opening the file in a different program first, sometimes Lightroom will choke on a file that RawTherapee opens fine. If that fails, dedicated file-recovery software can sometimes rebuild a partially corrupted RAW, though success rates drop the more damaged the file is. The real fix is prevention: always let the camera finish writing before removing a card.
Colour shifts after import are often a white balance or colour profile mismatch between your camera and your editing software. Check that your software is using the correct camera colour profile (Adobe's Camera Standard or your camera manufacturer's profile), and recalibrate your monitor if colours look consistently off across every shot, not just one.
Software won't open a newer camera's RAW files is almost always a version issue. Update Lightroom or Camera Raw first; if your software has stopped receiving updates, run the files through Adobe DNG Converter to translate them into a format your editor can read.
Files look flat and lifeless straight out of the camera isn't a fault, it's how RAW is meant to look before you apply contrast, saturation, and tone curves. That flatness is what gives you the room to edit in the first place.
A working photographer's perspective on RAW
Client work leaves no room for regret over a recoverable exposure mistake. For weddings and branding sessions, RAW is non-negotiable, it's the only format that lets us match skin tones consistently across an entire gallery. JPEG earns its place for quick behind-the-scenes shots nobody's paying to have retouched.
If you want professionally edited photos without the storage headache
Life in style Photography handles the entire RAW workflow for you, capture, culling, colour grading, and export, so you receive polished, edited images without ever touching a RAW file yourself.

Every shoot, whether it's a personal branding session, a wedding, or a headshot, starts in RAW and gets carefully edited into finished JPEGs delivered ready to use. Want select RAW files for a commercial project? That's available on request with clear licensing terms discussed upfront, so there's no confusion about what you're getting. If you're planning an event or a couples session and want images that hold up whether they're printed large or shared online, get in touch to check availability and talk through what deliverables suit your project.
Sources
Recommended
- Wedding Photography Styles: A Complete Guide for Couples
- Auckland Fashion Photographer - Auckland Portrait, Branding & Wedding Photographer | Life in Style Photography
- Fitness Photographer - Auckland Portrait, Branding & Wedding Photographer | Life in Style Photography
- Real Estate Branding Photos for Agents: Shot Checklist